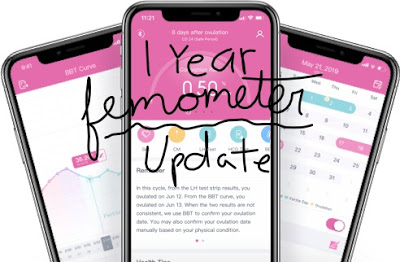
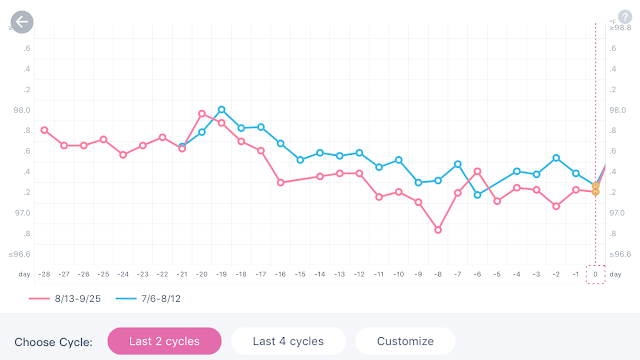
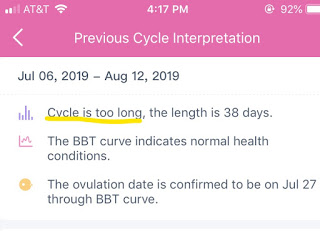
bookmark_borderAm I Still Loving the Femometer?! – 1 Year Update

Hey earth muffins! I cannot believe it has been a full year since I started using the Femometer as part of the Basal Body Temperature natural birth control method. I unboxed my Femometer a little over a year ago, so I thought I would share what I am still loving (and not loving) about this product. Spoilers – I still LOVE it! 😄

 
femometer app screen

What I Love – The Pros:
~For someone with a longer cycle than the average woman, this app is much more accurate when it comes to making cycle predictions. Before I starting using the Femometer, I was using an app called Flo that just did not understand that my cycle lasts for about 35-38 days. It would predict based on the “average length of a cycle,” which often made it very very wrong (so much so that I would often track on my own too which basically defeated the purpose of using the app). I LOVE that the Femometer adjusts its prediction after each cycle – it can accurately detect the start of both my period and ovulation 95% of the time (the rest are off by 1-3 days), which is just incredible!

~Getting into the habit of taking my temperature was super easy, as I was basically in the habit by my month 3 update. After the habit is formed, you will definitely not forget to take your temperature each morning, and I love the addition to my morning routine.

~Going off of that last point, I formed my habit so well that I actually took my temperature in my sleep once 😅 This didn’t throw off my chart though, because you are able to delete any “abnormal” readings or pick the accurate one if you take it twice by accident. While I haven’t experienced any abnormal instances other than this one, it would be super helpful for keeping your charts consistent when you have a fever.

~NO PERIOD SURPRISES! 🩸 See the first bullet point.

~The visual data in the app is amazing – there are so many different charts that are tracked for you in the Analysis tab in your profile. From analyzing every single data point that has ever been taken to just visualizing each cycle for consistency, the real magic of this device is the data you get. It definitely helps you take charge of your cycle, which is so empowering to me!

visual data and graph in femometer app
Overlaying your cycles can help you see how similar they are!

What I Don’t Love – The Cons:
~Unfortunately, the app doesn’t re-adjust your ovulation date until after your period starts when it analyzes the cycle. While my ovulation date is usually accurate, it might vary by 1-3 days. This doesn’t bother me too much, as I also do the Cervical Mucus method that makes it super easy to tell when I am the most fertile; however, it is something to think about if you aren’t using any other birth control methods.

~As I’ve mentioned in prior updates, I don’t like that I need to sync my thermometer to the app each day… But it is a small time commitment that isn’t a huge deal.

~I also don’t like that the comparison charts use the “average” woman’s cycle… It is especially not as helpful for someone who has a longer cycle, but I understand that I am an outlier in this regard. 🤷‍♀️

analysis of cycle on femometer app

Overall verdict, please do yourself a favor and purchase a Femometer! The $30 you pay is SO worth it! What are your thoughts on using the Basal Body Temperature method?

Love,
Jenna ♥

➡️ Subscribe to never miss a post! ⬅️

Loading

bookmark_borderMy Tips & Tricks for an Armpit Detox 💪

Hey earth muffins; Happy Monday! To start this week off right, I want to share my tips and tricks for dealing with an armpit detox… Now some of you might be asking, “What the heck is an armpit detox?”, so you definitely came to the right Earth Muffin! Let’s jump right into the post!

What is an armpit detox?
An armpit detox is a detox for your armpits (duh! 🙄) that often occurs after switching from an aluminum based deodorant to a more natural deodorant (such as the natural deodorants from Pretty Frank). When using products that contain aluminum your body is prevented from perspiring, which is why they are often labeled as “antiperspirants”. After switching to a deodorant that lets you sweat, your body isn’t used to it… This results in the armpit detox where you might notice excess sweat and smell coming from your pits as you sweat out the gunk/toxins that have been sitting in your armpit for months and even years! 😷

My Experience with an Armpit Detox
When I switched and started using Pretty Frank’s Wild Wood deodorant, I (surprisingly) didn’t experience much of a detox. I maybe had more sweat than usual for a few days, but nothing too crazy. I did however notice my body actually sweating in the pits for the first time in my LIFE, which was such an interesting thing to think about.

natural deodorant for armpit detox

Tips for Surviving Your Armpit Detox
If you make the switch to natural deodorant, you might experience a much longer detox than I did, so I thought I would share my tips to help you mitigate the sweat and the smell!

1. Pick a time that works the best for you – Don’t try to make the switch when you have a lot of presentations in class or know you will be wearing a lot of tank tops. I think winter is probably the best time of the year for a detox, as you can wear a shirt under a sweater to catch any excess sweat or smell!

man sweating

2. Dab away the sweat often – You will find yourself sweating more than usual, so feel free to use some toilet paper or tissues to dab away the sweat often. I would do this whenever I went to the bathroom, as it is an easy thing to do while sitting on the toilet (sorry for the TMI haha).

3. Reapply when necessary – Feel free to reapply deodorant if you feel like the smell is getting particularly bad… Just make sure you don’t over do it so that your armpits turn white or it rubs into your clothes. You wouldn’t want a stain!

4. Let your pits have space – This process is completely normal, so let your armpits detox all the gunk! I would avoid wearing any tight-in-the-pit clothes to prevent from even more irritation. #freethepits!

5. Have a back-up smell blocker – If you are super concerned with the idea of slightly smelly pits, double up your odor blocker by using body spray, perfume, essential oils, etc. Please don’t use too much though, nobody wants to smell you from a mile away!

6. Make sure the scent of your natural deodorant works for you – Some body odors don’t mix well with certain scents, or your body odor might smell similar to a scent. If you aren’t liking the smell of the first product you try out, don’t give up and try again! It is really a trial and error process until you find the deodorant that works for you. 😊

pinterest graphic about armpit detox
Pin to read later!

Have you had an armpit detox before? What are your tips for making it easier?

Love,
Jenna ♥

➡️ Subscribe to never miss a post! ⬅️

Loading

bookmark_borderHow to Zero Waste Your Airplane Flight ✈️

Hey earth muffins! After branching out from my “How to Zero Waste Your [insert room here]” series into topics like periods, I thought it would be fun to explore traveling. As I recently took a trip to Washington D.C., it seemed like the perfect time to share my tips for being low waste on an airplane. 😊

Note: flying on a airplane is not good for the environment. It is actually one of the worst things to do… So, there really isn’t a “zero waste” way to fly; however, if you must fly these are tips that you can use to mitigate other waste at the airport and on board.

1. Book an airline that uses online boarding passes – You won’t have to worry about printing your ticket or losing it along the way! Just make sure your phone is charged up to be scanned through security and the gate. Delta has a great app I use, but I am sure many other airlines offer this lovely feature.
 
 
2. Bring your own water bottle – People I talk to are often unaware that you can bring your own water bottle through security (just make sure it is empty when you go through!). Airports have water fountains near the bathrooms, which reduces the need to buy plastic water bottles in the airport or to get a beverage during the in-flight food service.

3. Be prepared with some snacks! – Again, you can bring snacks through security! For my trip to Washington D.C., I brought along some pretzel sticks in a reusable sandwich bag. 🥨 I was able to refuse the snack mid-flight and even have some leftovers for my layover. While I didn’t have enough space in my bag to bring as much food as I could have, at least a few snack packages were saved!


4. Bring your own ear buds/headphones (noise cancelling is recommended!) – You can usually purchase cheap, throwaway-able ear buds on flights, but save your money (and the planet) by bringing your own!

5. Don’t check a bag; bring a carry-on! – Even if you have your own luggage tag, your checked bag will still get adorned with some extra stickers and tags that are unnecessary. Save that waste by packing light and bringing only a carry-on. 🧳

Pin to read later!

What do you do to reduce waste when flying?

Love,
Jenna ♥

➡️ Subscribe to never miss a post! ⬅️

Loading

bookmark_borderThe Weekender’s Guide to Washington, D.C.

Hey earth muffins! As you could tell from @lifeofanearthmuffin, you will know that I recently spent a few days in Washington, D.C.! While I wasn’t there to be a tourist (I was attending an accounting conference for my graduate program), I did have some extra time in the evenings to do a bit of exploring… So I thought it would be the perfect opportunity to write another Weekender’s Guide post 😊 Let’s jump right into it!

What To Do:
1. Walk around to visit all of the monuments – I’m talking Washington, Lincoln, Jefferson, etc. There are SO many cool monuments to visit! There is quite a bit of walking involved to get to all of them, so you might consider taking the Metro. If you are going to ride the subway, you will need to purchase a Smartrip card for $2 and then add money onto the card depending on the price of the fare to each stop. The Metro machines can be quite complicated but there are always nice workers ready to help! 👍

2. Hit up museums – Many of the museums are FREE, so I would definitely recommend checking out as many as possible. You can see some amazing things all the way from Dorothy’s ruby red slippers to space ships. There’s a lot of history to learn!

3. Take a double decker tour bus – If you don’t have a lot of time, consider taking a bus tour. The one I went on was during sunset, and we hit a ton of monuments in only three hours. Such a great way to see the city!

4. Take a picture in front of the White House – It is surprisingly smaller than you think it would be…. 📸

5. Hit up The Player’s Club (1400 14th St NW) – If you are looking for a cool night life scene, I suggest this club. There is a sky deck, pool tables, games (pin ball, etc.), and even a whole shelf of board games. As someone who doesn’t drink, there were plenty of other fun things to do.

What To Eat:
1. Buredo – This place has sushi burritos!! Literally two of my favorite foods morphed into one – how could I not eat there? 🍣

2. Georgetown Cupcakes – I used to bake cupcakes all the time, so it was a blast from the past to go into a cupcakery. While I now think cupcakes are overly sweet (I’d definitely prefer a cookie), this was one of the more tasty cupcakes I have tried!

3. Picnic on the Washington Mall – The Washington Mall is absolutely gorgeous if the weather is nice, so I recommend buying your favorite dishes/snacks at the grocery store for a fun little picnic! Plus, this can be much cheaper than eating out. 🙂

Where to Stay:
1. Homewood Suites by Hilton (1475 Massachusetts Ave NW) – I stayed here and it was really nice… And it wasn’t as expensive as some of the other hotels around. It was a 15 minute walk from the White House, so you definitely can’t beat the location!

Pin to read later! 

What are your favorite things to do in Washington, D.C.?

Love,
Jenna ♥

➡️ Subscribe to never miss a post! ⬅️

Loading

bookmark_borderMy Tips for Scoring on Facebook Marketplace!

Hey earth muffins! As many of you already know, I recently moved into an apartment for grad school… While I wrote an exhaustive list of everything to pack in a recent post, I surprisingly did not have everything on that list when I moved in. 🤔 Moving to campus this early is awesome because many students are just about to move out, which means Facebook Marketplace gets a lot more listings! My roommate and I were able to find some great deals on Marketplace (including a super nice dining room table for only $45!), so I wanted to share my top tips for scoring big with you all today! 🎉

Pin to read later!

1. Only start looking when you are able to pick up/purchase – When I knew we were looking for certain pieces of furniture, I started looking on Facebook a week or so before we were set to move in. People will definitely not wait for you to pick things up and will just sell to someone else, so don’t even bother looking until you are able to get in the car and go get the goods.

2. Keep watching the “Recently Added” feed – People post things all throughout the day, so make sure you never miss a listing that you will be interested in!

3. Jump fast with offers– If you are even remotely interested in the listing, contact the seller as soon as possible! Getting some clarifying information will allow you to make a decision before the item is either sold or you buy it. If you know that you would like to buy it, immediately message the seller and ask them when they would like you to pick it up so that they don’t sell it to someone else!

4. Be wary of making counter offers – Items that are extremely popular, low-priced, or recently listed will sell quickly, so don’t even bother trying to get a discount… The seller will just give it to someone who is willing to pay full price! However, if the item has been on Facebook Marketplace for awhile feel free to do some negotiating!

5. If you message a seller and decide not to purchase, let them know! – This makes the selling process so much easier, so don’t be a ghost 👻

6. Don’t buy everything – There are definitely some amazing deals on Facebook Marketplace (I saw some lady selling a 50 piece Tupperware set for $5!!), but that doesn’t mean you should purchase it all. Especially if you are trying to live a more sustainable lifestyle, take care to think if a) you really need the item and if b) the item is built to last.

7. Make sure to clean everything – Just like I mentioned in my tips for thrift shopping post, wash/clean the items you purchase right away. These items are still secondhand and can be from someone’s basement, so make sure there is no dirt or dust before you bring it into your home. 😊

What have you bought off Facebook Marketplace?

Love,
Jenna ♥

➡️ Subscribe to never miss a post! ⬅️

Loading

bookmark_borderHow to Zero Waste Your Period ❣️

Hey earth muffins! While my “How to Zero Waste Your [insert room here]” series was originally supposed to only focus on certain rooms of the home, I really wanted to write about periods today (don’t ask me why 😆). I have tackled everything from the laundry room to the kitchen in my “How to Zero Waste Your —” series, but periods happen every single month for 50% of the population… That is a lot of waste that can be avoided! Here are some great ways for you to mitigate your own waste during that time of the month:

Pin to read later!

1. Menstrual cups – After going through the pros and cons of a menstrual cup here on Life of an Earth Muffin, I decided to purchase a Lena cup for Plastic Free July. If you read my Waste Audit at the end of the challenge, you will know that I struggled to get the cup to work for me… But menstrual cups are definitely one of the best options for a zero waste period! I am continuing to try out this cup, and I am extremely hopeful that I will be able to make the switch eventually. 😊

2. Reusable pads – Just like reusable diapers for babies, these cloth pads can be washed and washed again and again. 👍 Disposable pads are often filled with chemicals, which can make your period smell unpleasant (it isn’t actually supposed to smell ladies!). You can purchase these reusable pads on many websites, but Amazon and Etsy both have a bunch of options for cheap prices.

3. Herbal remedies – Medicines like Midol and Tylenol can be helpful during your period, but these lead to plastic waste. Try to incorporate more natural ways to reduce menstrual cramps – like these herbal remedies from Our Blue Ridge House. A DIY heating pad made from an old sock filled with rice is another great way to reduce period pain.  

4. Period panties – While these are more expensive than the other options (as you will need to purchase a few pairs to last for your period), you might want to make the investment. 🤔 I don’t know if I would personally like to “free bleed”, but it definitely would give you the freedom to not have to worry about your period during that time of the month!

5. Reusable tampon applicators – This is obviously not completely zero waste as you would need to still use tampons, but reducing the plastic of an applicator per each tampon is definitely a win! 🎉 This is similar to a menstrual cup as you would need to wash/sanitize it after each use to keep it bacteria free.

How do you try to reduce your waste on your period? 

Love,
Jenna ♥

➡️ Subscribe to never miss a post! ⬅️

Loading

bookmark_border10 Things I Don’t Buy Anymore ft. Low Waste Living

Hey earth muffins! Ever since starting my journey towards living low/zero waste I have been making a lot of changes in my life. 😃 This has been an amazing experience for me, and it has definitely changed my life for the better. Today I wanted to share with you all some things that I have stopped buying “cold-turkey” because of this journey. Here are the things I don’t buy anymore!  🎉

A picture of a plant with the words Things I Don't Buy Anymore over it

1. Paper towels – As I’ve mentioned in both my How to Zero Waste Your Cleaning Supplies and How to Zero Waste Your Kitchen posts, I have replaced paper towels with rags and washcloths. This change was one of the first ones I made, as my mom gave me a ton of old washcloths that she was going to get rid of. 👌

2. Ziploc bags – The news is full of horror stories about plastic grocery bags, but Ziploc bags are used almost as much. Why do you need to use three bags for one packed lunch? To get around this I use Tupperware, reusable sandwich bags, and mason jars!

3. Plastic wrap – Instead of this disposable wrap try using Tupperware instead! I haven’t even thought about using plastic wrap since I stopped using it, which shows just how unnecessary it is. Pyrex makes some great containers (both glass and plastic), and you can also buy (or make!) some beeswax wrap. 😊

4. Q-tips – I used to use two Q-tips every night after I showered… And you aren’t really even supposed to use those to clean your ears! I briefly mentioned ear picks in my very first Living a Lower Waste Lifestyle 101, and I definitely recommend checking them out. Such a great alternative!

5. Clothes that aren’t second hand – I shouldn’t say I NEVER buy new clothes, but it is a very very rare occurrence. Thrift shopping is a new hobby of mine, and it is actually much easier than people think. Check out my top tips if you are new to the thrifting game!

6. Laundry detergent – I don’t buy laundry detergent after getting myself an EcoEgg instead. This little device lasts for over 200 washes(!!) before the pellets need to be replaced. Saves on plastic, is all-natural, and makes my clothes so clean!

Buy on Amazon for only $20!

7. Dryer sheets – I found myself some dryer balls at TJMaxx as I was starting my journey to sustainable living, and I love the fact that I don’t find the dryer sheets in random arm/leg holes because of all the static. 😝

8. Disposable toothbrushes – I guess I never really used disposable toothbrushes unless I was traveling due to the fact that I love my electric toothbrush… But now I just bring my electric one when I travel too!

9. Plastic water bottles – I have mentioned this is multiple Plastic Free July posts, but you should NEVER use plastic water bottles unless the water is unsafe to drink. End of story.

10. Snack foods – After falling in love with shopping in the bulk bins, there is really no reason to buy individually packaged snack foods. This has probably been the hardest switch for me as I love the junk foods that I have been eating for years, but I am slowly replacing all of them!

I may or may not still buy Sour Patch Kids from time to time 😬

What have you been giving up to be more sustainable?

Love,
Jenna ♥

➡️ Subscribe to never miss a post! ⬅️

Loading

bookmark_borderPlastic Free July Wrap Up – My Waste Audit

Today is the last day of July, which means the Plastic Free July challenge officially ends tomorrow. 🎉 While the month long endeavor might be coming to a close, I will (obviously) continue to avoid plastic as part of my journey towards living a sustainable low-waste lifestyle. As a wrap up for this month, I wanted to share with you all today the plastic waste that I created. 😊 Let’s dive right into it!

All of the plastic used in July:


Along with these plastic items, there were a few other things that I was unable to collect:

-Hot dog container from work event
-Approx. 12 pads and their wrappers from my period
-Two trash bags

Overall, I think that I did a nice job… But there are definitely areas I need to improve on! First, I really want to strive towards making my period zero waste. As I knew it was going to start the second week of July, I wanted to try out a menstrual cup. I bought the Lena cup off of Amazon and instead of a cardboard box they shipped it in a bubble mailer. 😑 That was a fail and then I also just could not get the menstrual cup to work for me (hence why there are 12ish pads in my total plastic haul). As I mentioned in my Should I Get a Menstrual Cup? post, cups are “easy to use” in theory… But it was just a huge struggle for me. While I haven’t given up on the Lena cup yet, it just didn’t pan out for Plastic Free July.

I think the second area of improvement would be making my work office more sustainable. Not only did I attend a baseball game event where it was expected of us to eat the food that was provided by the firm (resulting in the hot dog container and Gatorade bottle), but they also only have individually packaged snacks and candy in the office building (which resulted in me indulging in some Hershey Nuggets without thinking about the challenge). 🤷‍♀️ As an intern, I felt uncomfortable going against the norm especially at the baseball event… But when I start full-time with the company next year, I will definitely be having a sustainability chat with my supervisors!

What can be recycled or reused:

Not all of the plastic that I collected will be going to the landfill however. 🥳 My local recycling pick up will be able to recycle all of these things, and I will be re-using the Amazon bubble mailer when I move out of this apartment and into my school apartment in August.

What is going to landfill

Even though I grocery shop locally and use my own bags, it seems like a majority of the waste I created was related to food. For the whole month of July I collected 17 stickers from various fruits and vegetables as well as a rubber band holding broccoli stems together at the farmer’s market. I was able to find a local health food store that sells milk in glass bottles, but the lid was still plastic. However, I am proud to say that I avoided a lot of plastic packaging by not purchasing any meat, getting bread from a local bakery (and having them put the bread in my own bag), and shopping from the bulk bins. 😃

Overall, I definitely learned a lot of the same lessons as last summer from participating in Plastic Free July. However, I avoided a lot more plastic this year because I held myself accountable to the goals I created at the end of June. 💚 I look forward to this challenge again next summer!!!

How did your Plastic Free July go??

Love,
Jenna ♥

➡️ Subscribe to never miss a post! ⬅️

Loading

Buy Me A Coffee